Have you ever wanted to bake real sourdough bread but felt totally lost on where to start? You’re not alone. Sourdough has a reputation for being mystifying and complex. Many first-timers aren’t even sure what sourdough starter really is. (Is it a special yeast? Something you buy?) In reality, a sourdough starter is just a simple mix of flour and water that ferments naturally – add water to flour, leave it out, and nature takes over with wild yeasts and bacteria creating bubbly life in your jar[1]. In fact, “a sourdough starter is made by mixing flour and water together in a jar,” and with regular feedings it becomes strong enough to bake bread in about 7-10 days[2]. Yes, you can literally create your own yeast with two ingredients from your kitchen! So if you thought you needed someone to gift you a bit of their starter or some fancy packet from a store, take heart – you can make it yourself from scratch.
That all sounds encouraging, but maybe you’re still nervous. Fermentation, feeding a starter, hydration levels – it can feel like a science experiment (and to be honest, it kind of is!). It’s completely normal to have butterflies when starting out. One home baker admitted that the whole sourdough thing “always made me a bit nervous… almost gives me butterflies”[3]. There’s the fear of failure too: What if my starter dies? What if I invest all this time and end up with a brick instead of bread? Rest assured, even if your starter looks sluggish or “dies down” for a day, it’s usually part of the process. For example, it’s common to see lots of bubbles on day 2 or 3 and then a quiet phase – many newbies mistakenly think their starter has died and give up, when it just needs a few more days to stabilize[4]. Sourdough baking is a bit of a journey, and like any journey there’s a learning curve. You might also feel overwhelmed by all the steps and jargon: autolyse, proofing, hydration, scoring – it’s a lot! If you’ve been scrolling through Instagram or watching experts on YouTube, you might be thinking, “This is too complicated for me.” Take a deep breath. Every master baker was a beginner once, and it’s okay to be confused at the start.
The “After”: Imagine Your Sourdough Success 🎉
Now, let’s fast-forward past those worries and imagine something amazing. Picture yourself pulling a beautiful, crackling-crusted loaf of sourdough out of your oven. The kitchen fills with that unbeatable aroma of freshly baked bread. You slice into the loaf (the crust sings as it crackles) and see the airy, honeycombed interior. You take a bite – it’s tangy, chewy, and absolutely delicious, with a flavor better than anything you could buy at a store[5]. And the best part? You made this with your own two hands! From just flour, water, salt, and time, you’ve created a living bread. There’s a real sense of pride that comes from nurturing a sourdough starter and baking your first loaf. It’s like that first garden tomato or a home-grown herb – a feeling of I did this!
Not only will you feel proud and accomplished, but you’ll also feel connected to a simple tradition stretching back generations. People have been baking bread with wild yeast for millennia, long before commercial yeast packets existed[6]. When you bake sourdough, you’re participating in an ancient, simple practice: mixing flour and water and letting nature do its work. It’s the same method our great-great-grandparents used. That connection to history and simplicity is surprisingly joyful. Many new sourdough bakers describe feeling a deep satisfaction from this process – it’s therapeutic to slow down and tend a starter each day, and incredibly rewarding to pull a wholesome loaf from the oven knowing it started with just flour and water.
Imagine the confidence you’ll have after a few bakes: you’ll know exactly how to create and care for a starter, and you’ll be turning out rustic sourdough boules or baguettes on a weekend morning with ease. Friends and family will be delighted (and maybe a little amazed) that you’re offering them slices of warm, homemade sourdough. You might find yourself saying things like, “Oh, it’s no big deal – I just mixed up some starter and threw this loaf together.” (Who would’ve thought you would be saying that?) And beyond the pride and bragging rights, you’ll get to enjoy bread that is naturally leavened, free of commercial yeast, and full of flavor. Many people also find sourdough more digestible than regular bread, thanks to the fermentation – it’s a win-win of taste and health[5].
A rustic sourdough loaf, with a crackly golden crust and soft interior – just like the one you’ll be proud to bake at home!
By now, you can see that the after picture of your sourdough journey looks pretty wonderful. So how do you get from the nervous beginner (the “before”) to the confident baker enjoying that first loaf (the “after”)? That’s where the bridge comes in.
Bridging the Gap: From Novice to Natural – How to Get There
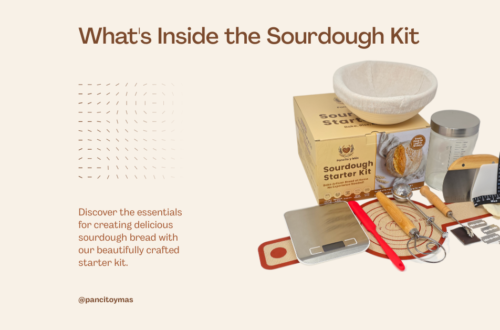
To bridge that gap, you need two things: knowledge and support. The good news is both are readily available – and sourdough beginners have more resources today than ever. One fantastic resource (and one that inspired this post) is Pancito y Más, a company on a mission to make sourdough approachable for everyone. They understand exactly what it’s like to start from zero. Pancito y Más literally exists to give beginners the confidence, tools, and guidance they need to succeed[7]. They’ve created products and tutorials specifically designed to simplify sourdough baking. In fact, their Complete Sourdough Starter Kit was created so you can “jump straight into this trend without feeling overwhelmed”[7]. Instead of piecing together information from random blog posts and buying tools separately, Pancito y Más brings everything together in one place – truly a bridge to take you from unsure to unstoppable.
Let’s walk through how you can get started, step by step, to show how simple it can be. Even if you do nothing else, try these first few steps and you’ll be on your way!
Step 1: Make Your Starter (Flour + Water Magic)
Yes, we’re back to that magical flour and water combo. Creating your starter is the first milestone in your sourdough journey. Here’s how to do it:
- Day 1 – Mix Flour and Water: In a clean jar, stir together 100 grams f whole wheat flour (or unbleached all-purpose) and 100 grams of room-temperature water until there are no dry bits. You’re aiming for a thick, pancake-like batter. Loosely cover the jar with a lid or clean cloth (air needs to get in). Place it in a warm spot (~70–75°F is ideal). That’s it! This is the birth of your starter.
- Day 2 – Wait and Watch: Check your jar. You might see a few bubbles or you might see nothing yet. Both are okay. Give the mixture a quick stir to oxygenate it. If it’s very dry on top, you can add a tablespoon of water and stir again. Otherwise, no feeding on Day 2 – just keep it warm and let it do its thing for another 24 hours. (If you do happen to see lots of bubbling already, you can proceed to feed, but usually it’s slow at first.)
- Day 3–6 – Daily Feedings: Now the real fun begins – you’ll feed your starter each day to help it develop. Feeding is simple: discard about half of the starter in the jar (you can toss it, or save the discard in a separate container for recipes like pancakes). Then add fresh flour and water to the jar: about 100 grams of flour and 100 grams of water each day, and stir well. This “refreshes” the starter’s food supply. Try to do this at roughly the same time each day. As the days go on, you should notice the starter getting bubbly and rising a bit more after each feeding[8]. (Tip: put a rubber band or piece of tape on the jar to mark the level right after feeding – you’ll clearly see later if it has risen.) Keep it in that warm spot; consistent warmth really helps. By day 4 or 5, a healthy sourdough starter will have a tangy, fruity smell (totally normal) and lots of bubbles. If at any point you see a layer of liquid “hooch” on top, just pour it off and feed the starter – it’s a sign it’s hungry or fermenting a bit fast.
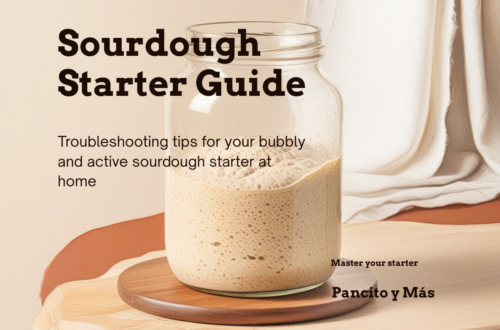
- Day 7 – Starter Ready! By day 7 (give or take a day or two), your starter should be very active and bubbly. It will likely double in volume a few hours after a feeding and have a pleasant sour aroma. How do you know it’s ready to bake with? One clue is the float test: drop a small spoonful of starter into a cup of water – if it floats, that means it’s full of air and strong enough to leaven bread[9]. (If it sinks, don’t fret; just keep feeding daily for a few more days and try again.) When your starter consistently doubles in size within ~4–8 hours of feeding and is nice and bubbly, congratulations – you’ve successfully grown your own sourdough starter!
A bubbly sourdough starter thriving in its jar. By the end of a week, your starter will be full of bubbles and doubled in size after feedings, as shown above. This means it’s active and strong. You now have your very own living leavening agent ready to bake bread!
With your starter alive and well, you’ve crossed a major hurdle. Give yourself a high five – the hardest part for many beginners (keeping that starter going) is done. And remember, if any of these steps feel confusing, Pancito y Más’s kit comes with a detailed 7-day Starter Plan and feeding schedule to walk you through it day by day[10] (no guesswork needed). They even include a free web-app to remind you when to feed and to help troubleshoot any issues (like if you ever see that “hooch” or if your kitchen is colder and things are slow)[11]. In other words, they hold your hand through the process so you’re never left scratching your head.
Now, let’s get to the baking part – turning that starter into a loaf of bread!
Step 2: Bake Your First Loaf of Sourdough Bread
Baking sourdough bread can be as simple or as complex as you want to make it. As a beginner, we’ll keep it simple and straightforward. Here’s a friendly overview of the process to bake a basic sourdough loaf with your new starter:
- Mix the Dough: In a large bowl, combine flour, water, salt, and a bit of your starter. For example, you might mix 500 grams of flour, 350 grams of water, 10 grams of salt, and 100 grams of active starter (ripe from that Day 7 feeding). Stir everything together until it forms a shaggy dough and no dry flour remains. (No need for a fancy mixer – your starter and time will do the work of gluten development! You really don’t have to knead vigorously – just mix until combined[12].)
- Let it Rise (Fermentation): Cover the bowl with a damp towel or plastic wrap and let the dough rest and rise at room temperature. This is called the bulk fermentation. Depending on the temperature, this first rise might take around 6–8 hours (for instance, mix the dough in the morning and it’s ready to shape by late afternoon). Over this time, the dough will puff up as the wild yeast in your starter creates carbon dioxide. You can gently stretch and fold the dough a couple of times during this period if you want (this helps strengthen it), but it’s not absolutely required for a basic loaf.
- Shape the Dough: Once the dough has roughly doubled in size and looks billowy, gently turn it out onto a lightly floured surface. Shape it into a ball (for a round loaf) by folding the edges into the center, creating surface tension on the outside of the dough. Don’t overthink this step – the goal is just to make a smooth ball. Place the dough seam-side down on parchment paper or a lightly floured towel. Congratulations, it’s starting to look like a loaf!
- Second Rise (Proofing): Let the shaped dough rest for another 1–2 hours at room temp. This short second rise lets it expand a bit more. (If timing is tricky, you can also cover it and put it in the fridge overnight – cold proofing – and bake it the next morning, but at least an hour at room temp before baking is needed if chilled.) While it’s proofing, preheat your oven to 450°F (230°C). If you have a Dutch oven or heavy pot with lid, preheat that in the oven as well – baking inside a preheated pot helps trap steam and gives you a glorious crust.
- Score and Bake: Right before baking, take a sharp knife or bread lame and slash the top of the dough about ½ inch deep. (This is called scoring – it allows the loaf to expand properly in the oven and creates that beautiful “ear” or ridge.) Carefully place the dough into your preheated Dutch oven (watch those fingers). Bake at 450°F for about 30 minutes with the lid on, then remove the lid and bake another 10-15 minutes until the crust is deep golden brown. (If you’re not using a lidded pot, you can bake on a baking sheet or stone – just toss a few ice cubes or a bit of water onto a hot tray in the bottom of the oven to create steam at the start.)
- Cool (the Hardest Part!): When your loaf is done, take it out and let it cool on a rack for at least 1 hour before cutting in. This allows the interior to set properly. You’ll hear the crust crackling – the song of a good sourdough! It’s super tempting to slice into a warm loaf, but waiting will be worth it (cutting too early can make it gummy). Once cooled, slice it up and enjoy the fruits of your labor. Slather on some butter or scoop up some soup – pure heaven!
And there you have it – your first sourdough bread. 🎉 It might not be bakery-perfect or insta-worthy on the very first try, but I guarantee it will taste darn good. Each time you bake, you (and your starter) will get better and better. Before long, you’ll be tweaking recipes, adding herbs or cheese, or trying different flours with confidence.
Throughout this process, Pancito y Más is like a helpful friend by your side. Their kit and resources take the mystery out of each step. For example, the Pancito y Más Complete Sourdough Starter Kit includes all the tools a beginner needs: a feeding journal jar (so you can track your starter’s growth), a digital scale for accuracy, a dough whisk for easy mixing, a bench scraper, a proofing basket for that professional loaf shape, even a scoring lame for those Instagram-worthy patterns – 13 pieces in total[13]. It also comes with a 50-page handbook lovingly called the “Sourdough Bootcamp Guide,” which has step-by-step recipes, a 7-day starter feeding plan, troubleshooting tips, and a baking log to record your results[13]. This means you don’t have to second-guess if you’re doing things right – the guide answers the common “Is this normal?” questions at each stage. Worried you’ll forget a feeding or not know when your starter is “hungry”? They’ve got you covered with their free Companion App that can ping you when it’s time to feed, and offers handy tips if, say, you see something odd in your jar[11]. Plus, Pancito y Más has a whole community of beginners and enthusiasts (via their blog and social media) where you can share progress and get encouragement. In short, they bridge the gap between wanting to bake sourdough and actually doing it by equipping you with knowledge, quality tools, and cheerleading support.
You started out confused and maybe a bit scared, but look at you now – you’ve learned how simple a starter really is, you’ve envisioned your success, and you even have a roadmap to follow. All that’s left is to take action and begin your sourdough adventure. And you don’t have to do it alone or empty-handed. If you’re excited (and I hope you are!), Pancito y Más is ready to help you every step of the way. Why not set yourself up for success from the start? They’ve already done the hard work of figuring out what beginners need most.
Ready to bake your own delicious sourdough and taste that success? 🥖 Take the leap and arm yourself with the right tools and guidance. Check out the Pancito y Más Complete Sourdough Starter Kit on Amazon – it might just become your new best friend in the kitchen. With a bubbly starter in your jar, a recipe in hand, and Pancito y Más by your side, you’ll go from sourdough novice to proud home baker in no time. Happy baking and bon appétit! 🎉👌
[1] [4] Making an Incredible Sourdough Starter from Scratch in 7 Easy Steps
https://www.theperfectloaf.com/7-easy-steps-making-incredible-sourdough-starter-scratch
[2] [5] [6] [9] [12] Beginner’s Sourdough Bread Recipe | Little Spoon Farm
https://littlespoonfarm.com/sourdough-bread-recipe-beginners-guide
[3] [8] Sourdough Starter – day by day guide to making your starter from scratch — The From Scratch Body
https://thefromscratchbody.com/home/sourdoughstarter
[7] [10] [11] [13] Pancito y Mas – Let it Rise